什么是 Runtime
苹果对 Runtime 的解释:
The Objective-C runtime is a runtime library that provides support for the dynamic properties of the Objective-C language, and as such is linked to by all Objective-C apps. Objective-C runtime library support functions are implemented in the shared library found at /usr/lib/libobjc.A.dylib.
Objective-C运行时是一个运行时库,它支持Objective-C语言的动态属性,因此所有的Objective-C应用程序都链接到它。Objective-C运行时库支持函数是在/usr/lib/libobjc.A.dylib的共享库中实现的。
本篇文章分析使用的 runtime 为 objc4-756.2
isa 是什么
首先来看下NSObject头文件的定义。
1 | typedef struct objc_class *Class; |
可以得出NSObject内部保存了一个类型为objc_class的结构体指针。接下来去runtime源码中寻找objc_class的定义。
1 | struct objc_object { |
可以看到有isa和superclass这两个成员变量。那么isa和superclass是做什么的呢。上经典图。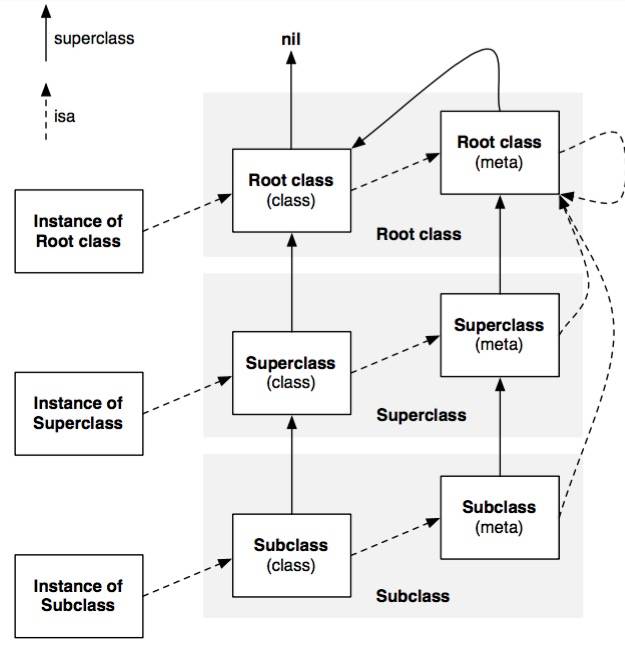
首先需要了解instance、class、meta-class他们之间的关系。需要先知道这些。
1.instance是class的具象化,内部只保存值。
2.class保存着所有instance的描述,例如:成员变量的类型和函数地址等。
2.meta-class保存着所有class的描述,例如:函数地址。
所以isa和superclass的存在就是为了完成面向对象的继承思想,那么接下来调用方法的过程就很好解释了。
1.如果是一个`instance`调用了函数
1.1 依据 instance 的 isa 指针找到 class
1.2 在 class 上找函数地址,如果未找到则通过superclass指针去父类中寻找,直至找到root class。如果还未找到,会报错。后面会有说消息转发的机制。

2.如果是一个`class`调用了函数
2.1 依据 class 的 isa 指针找到 meta-class
2.2 在 meta-class 上找函数地址,如果未找到则通过superclass指针去父类中寻找,直至找到root meta class。如果还未找到,会报错。后面会有说消息转发的机制。
KVO 实现分析
Apple 使用了 isa 混写(isa-swizzling)来实现 KVO 。当观察对象 Object 时,KVO 机制动态创建一个新的名为:NSKVONotifying_Object 的新类,该类继承自对象 Object 的本类,且 KVO 为 NSKVONotifying_Object 重写观察属性的 setter 方法,setter 方法会负责在调用原 setter 方法之前和之后,通知所有观察对象属性值的更改情况。
KVO 为子类的观察者属性重写调用存取方法的工作原理在代码中相当于:
1 | -(void)setName:(NSString *)newName{ |
那么如何验证这个原理呢,首先,创建一个 Test 类集成于 NSObject
1 | @interface Test : NSObject |
通过 runtime 来输出一个对象建立KVO之前之后的类对象地址和元类对象地址来做比对
1 | self.test1 = [[Test alloc] init]; |
得到的输出结果如下
1 | test1添加KVO监听之前 - Test Test |
可以发现,在 Test 对象被监听前 Test 对象的类对象是 Test(0x1056ed8e0。在) 类。 Test 对象被监听之后,系统为其创建了一个新类 NSKVONotifying_Test(0x7fff257223da) 并将其 isa 指针指向了新类 NSKVONotifying_Test。
Category 和 extension 有什么不同
首先新建一个 xcode 工程。添加如下代码
1 | @interface Test : NSObject |
通过clang将代码转成cpp文件
1 | clang -rewrite-objc Test+Ex1.m -o Test+Ex1.cpp |
这是查看Test+Ex1.cpp文件会发现多了如下代码
1 | struct _class_t { |
通过代码发现,clang帮我们生成了一个类型为_category_t名称为_OBJC_$_CATEGORY_Test_$_Ex1的结构体,并将结构体的第一个参数name设置成为了分类的名称。由此可以推断分类的数据结构体的类型是_category_t,而一个类的结构体是_class_t。接下来会通过runtime来分析生成的这个类型_category_t的结构是如何使用的。
runtime 启动加载
Objective-C的运行是依赖于runtime库,runtime与其他库一样,都是通过dyld动态加载进来的。首先打开runtime源码中的objc-os.mm文件并找到_objc_init这个函数。
1 | /*********************************************************************** |
通过注释可以得到_objc_init这个函数是引导程序初始化用的。这里主要关注的函数是这个_dyld_objc_notify_register。但是它的定义和实现不在runtime这个开源库中,如果要看实现可以查看dylb的源代码dyld源码。
接下来分析下三个参数map_images、load_images和unmap_image。
map_images
首先来看下源码实现
1 | void |
通过代码发现主要的实现逻辑是在map_images_nolock中。
1 | /* |
接下来来分析_read_images是如何实现的,_read_images大致可以分为四个部分,分别为加载类对象、加载协议对象、实现类对象、添加分类。接下来我们逐步分析。一下为去除部分非主流程的伪代码。
加载类对象
1 | // Discover classes. Fix up unresolved future classes. Mark bundle classes. |
加载协议对象
1 | // Discover protocols. Fix up protocol refs. |
实现类对象
1 | // Realize non-lazy classes (for +load methods and static instances) |
添加分类
1 | // Discover categories. |
load_images
在_objc_init 函数中,dyld_register_image_state_change_handler 将 load_images 作为回调函数注册给dylib,所以,当镜像的状态变化时,会回调load_images函数。
1 | void |